New Generation of VisionGauge® High-Accuracy Inspection & Measurement Systems Announced

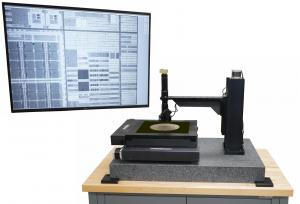
The VisionGauge® High-Accuracy Inspection & Measurement System is a powerful and easy-to-use solution across a wide range of industries, including semiconductor manufacturing.
The VisionGauge® High-Accuracy Inspection/Measurement System incorporates enhancements to dramatically increase the speed, usability and range of applications.
VisionGauge® High-Accuracy Inspection and Measurement Systems are used by a wide range of manufacturers across many different industries to carry out the high-accuracy inspection & measurement of the parts they produce. These systems are very intuitive and can be used directly on the shop floor. They have a number of powerful and unique technologies, including their patented CAD Auto-Align™ and CAD Auto-Pass/Fail™ tools for fully automated part-to-CAD comparison. These systems can use the part’s CAD data directly and as a result completely eliminate operator-to-operator variation.
The latest generation of VisionGauge® systems include enhanced CAD-comparison capabilities optimized to support extremely large and dense CAD files, such as those typical of the semiconductor industry. With these latest enhancements, complete inspection programs can be built by importing the part’s CAD and tolerance data.
They also include the new VisionGauge® Report Builder™ that automates inspection results report generation for quality assurance and traceability. The VisionGauge® Report Builder™ is a powerful tool designed to streamline the process of creating, customizing, and sharing professional inspection reports. Built with efficiency in mind, the Report Builder integrates seamlessly with VisionGauge® measurement and inspection systems, to transform raw data into polished, customer-ready documentation. The Report Builder features enhanced capabilities that simplify report creation while giving users greater flexibility in personalizing reports to their specific requirements.
The new VisionGauge® High-Accuracy Inspection and Measurement Systems are also available with an automation module to allow them to easily be interfaced to external machinery, for example for automated part loading & unloading. This automation module includes all the necessary hardware & software full 2-way Ethernet (TCP/IP) communication as well as 2-way I/O communication (over 24 channels) between external machinery and VisionGauge®, for full “lights out” operation. With this new automation module, VisionGauge® is at the forefront of the automation revolution.
Another new VisionGauge® High-Accuracy Inspection & Measurement System improvement is the system’s enhanced defect map that allows for fast “big picture” results analysis as well as easier and more detailed “drill down” defect review.
A recent customer provided the following statement about their VisionGauge® High-Accuracy Inspection and Measurement System:
"Entegris purchased a VisionGauge® High-Accuracy Inspection and Measurement System primarily to perform dimensional verification of our photopatterned production components. Since installing the tool 6 months ago, it has met all of our requirements and reliability expectations, and we have discovered several additional valuable use cases and capabilities. More specifically, the tool identifies voids or missing material on some patterned parts, and it has also identified foreign material/residue (which would negatively impact performance of the finished good) on other parts.
The automated heatmaps of the inspected parts have proven extremely useful in identifying patterns of defects, and comparing part-to-part repeatability. The ability to drill-down (from the heatmap) to stored images of each field of view has been critical in verifying that actual defects are being reliably detected, and that false failures are not being counted. The ability to manually change the pass/fail rating (after review of the saved image) of each field of view is just one example of the user-friendly software.
Entegris is more than satisfied with system performance, and we consistently find the application support and customer service to be prompt, pleasant, and extremely knowledgeable/valuable."
Matthew Chriss
NPI Engineering Manager
Entegris, Inc.
Bedford, MA USA
With micron-level resolutions, VisionGauge® High-Accuracy Inspection and Measurement Systems are extremely accurate. They are fast and very easy to use. They have always been customizable and with this latest generation of enhancements they are more widely applicable than ever.
With these new systems, fully automated inspection programs for parts that are very feature-dense can be created automatically, directly from the part’s CAD data. Furthermore, they allow manufacturers to achieve significant gains in inspection throughput. The new VisionGauge® High-Accuracy Inspection and Measurement Systems provide manufacturers with a real advantage in today's competitive market.
To learn more about the benefits of the VisionGauge® High-Accuracy Inspection & Measurement System, contact VISIONx, Inc., either by visiting the web site at www.visionxinc.com or by emailing info@visionxinc.com.
VISIONx INC. specializes in automated imaging, visual inspection and high accuracy measurement solutions sold worldwide and is the manufacturer of the VisionGauge® Digital Optical Comparator.
Patrick Beauchemin
VISIONx Inc.
+1 514-694-9290
email us here
Visit us on social media:
LinkedIn
Facebook
YouTube
X
VisionGauge®'s proprietary CAD Auto-Align™ & Auto-Pass/Fail™
Legal Disclaimer:
EIN Presswire provides this news content "as is" without warranty of any kind. We do not accept any responsibility or liability for the accuracy, content, images, videos, licenses, completeness, legality, or reliability of the information contained in this article. If you have any complaints or copyright issues related to this article, kindly contact the author above.

